The Ultimate Guide to Finding Your Perfect Foundation Shade Online

Shopping for foundation online feels like a gamble when you can’t swatch it in person. You’re staring at a screen trying to decide between “porcelain” and “ivory” or “sand” and “beige,” wondering which one won’t make you look like you borrowed someone else’s face.
The good news? You don’t need to order five shades and return four. There are actual methods to figure out your perfect match from your phone or laptop.
Finding your foundation shade online requires three steps: identifying your undertone through simple tests, using brand-specific virtual try-on tools or shade finders, and reading reviews from people with similar skin tones. Start with natural lighting photos of your jawline and inner wrist, then cross-reference multiple tools before purchasing. Most brands offer easy returns if the shade doesn’t match perfectly.
Understanding your undertone makes everything easier
Your undertone isn’t about whether your skin is light or dark. It’s the underlying hue that stays consistent no matter how tan or pale you get.
There are three main undertones: cool (pink or rosy), warm (golden or peachy), and neutral (a mix of both).
Here’s how to figure out yours without leaving your room:
- Look at the veins on your inner wrist in natural light. Blue or purple veins usually mean cool undertones. Green veins suggest warm undertones. Can’t tell if they’re blue or green? You’re probably neutral.
- Hold up white paper next to your face. If your skin looks pink or rosy against it, you’re cool-toned. If it looks yellow or golden, you’re warm-toned. Greenish? That’s olive, which falls under warm or neutral.
- Think about which jewelry looks better on you. Silver typically flatters cool undertones, while gold suits warm undertones. If both work equally well, you’re likely neutral.
These tests aren’t perfect, but they give you a starting point that’s way better than guessing.
Brand shade finders actually work when you use them right
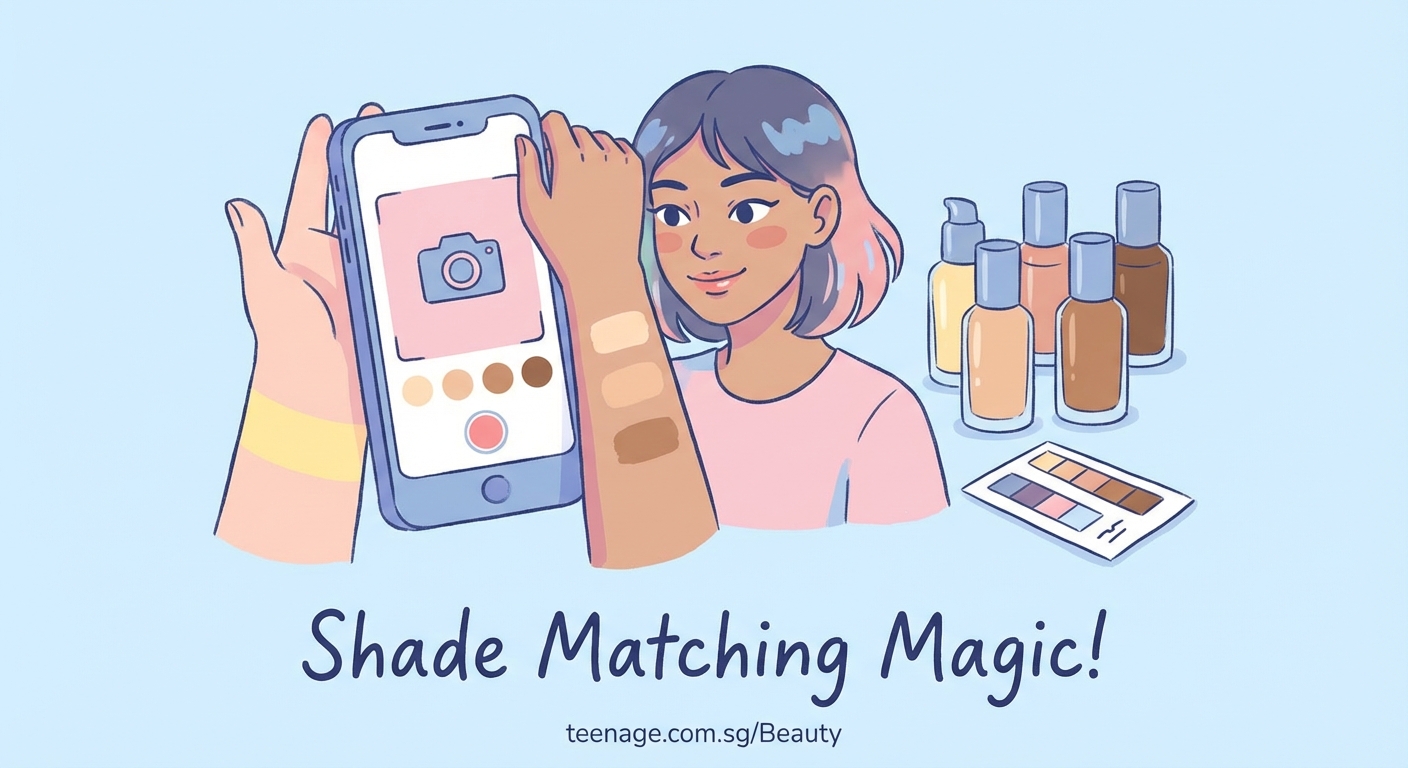
Most major beauty brands have online shade-matching tools. Some are better than others, but they all follow similar logic.
Here’s the process that gets the best results:
- Take photos in natural daylight near a window. Avoid overhead lights or lamps that cast yellow or blue tones.
- Include your full face, neck, and chest in the frame. Foundation should match your neck, not your face, to avoid the mask effect.
- Remove any existing makeup. Even tinted moisturizer can throw off the results.
- Use the brand’s tool on a device with a decent camera. Phone cameras from the last few years work fine.
- Answer questions about your undertone and skin concerns honestly. The algorithm uses this info to narrow down options.
Some brands like Fenty Beauty, Rare Beauty, and MAC have particularly accurate tools because they offer extensive shade ranges with detailed descriptions.
“The best virtual shade match comes from combining the tool’s recommendation with customer reviews from people who share your skin tone and undertone. Look for reviewers who mention their MAC shade or other reference points.” – Professional makeup artist recommendation
Reading reviews the smart way saves you from bad matches
Customer reviews are gold when you know what to look for.
Don’t just read star ratings. Search for reviewers who mention:
- Their undertone and depth
- Other foundation shades they wear (especially MAC, since it’s a common reference)
- Whether the foundation oxidizes (gets darker after application)
- How it photographs, especially if you care about looking good in selfies
For example, if someone says “I wear MAC NC25 and this shade in Medium Golden is perfect,” and you also wear NC25, you’ve found your match.
Watch out for reviews that only say “love it!” without details. They don’t help you figure out if the shade will work for you.
Common shade-matching mistakes and how to avoid them
| Mistake | Why it happens | How to fix it |
|---|---|---|
| Matching to your face instead of neck | Your face can be darker or lighter than your body | Always swatch on your jawline and blend down to your neck |
| Choosing shades in bad lighting | Indoor lights distort colors | Test in natural daylight or use a daylight-mimicking bulb |
| Ignoring oxidation | Some formulas darken after 10-15 minutes | Read reviews mentioning oxidation; test on your skin if possible |
| Picking the wrong undertone | Guessing instead of testing | Use the vein test and white paper test before shopping |
| Ordering based on seasonal tan | Your undertone stays the same even when depth changes | Buy for your current skin depth, not what you’ll be in summer |
The oxidation thing trips up so many people. A foundation can look perfect when you first apply it, then turn orange an hour later. This happens more with drugstore formulas, but even high-end brands can oxidize on certain skin types.
Virtual try-on apps have gotten surprisingly accurate
AR (augmented reality) try-on features used to be a joke. Now they’re actually useful.
Apps and websites from Sephora, Ulta, and individual brands let you see how shades look on your actual face in real time.
The technology works best when you:
- Use it in good lighting
- Keep your face still and centered
- Try multiple shades to compare
- Check how it looks from different angles
These tools aren’t perfect, but they’re way better than staring at swatches on a white background and hoping for the best.
Some people find that budget-friendly dupes for viral beauty products everyone’s talking about can be easier to match since they often reference the original shade names.
Sample programs and return policies are your safety net
Even with all these tools, sometimes you still get it wrong. That’s where smart shopping strategies come in.
Many brands offer:
- Free samples with online orders (request in the notes at checkout)
- Shade-matching guarantees with free exchanges
- Generous return windows (Sephora gives you 60 days)
- Travel sizes for testing before committing to full size
Don’t feel bad about returning foundation that doesn’t match. Brands expect it, especially for online orders.
If you’re torn between two shades, order both if the return policy allows it. Test them on your jawline in natural light and return the one that doesn’t work.
Building your foundation reference list for future purchases
Once you find a good match, write it down. Seriously.
Create a note on your phone with:
- Brand and shade name
- Your undertone and depth
- Whether it oxidizes on you
- The finish (matte, dewy, satin)
- How it wears throughout the day
This becomes your personal shade reference guide. When you want to try a new brand, you can search “[your current shade] equivalent in [new brand]” and usually find conversion charts or Reddit threads with comparisons.
The beauty community on Reddit, YouTube, and TikTok is incredibly helpful for this. People love sharing their shade matches across different brands.
Your foundation journey starts with one good match
Finding foundation online doesn’t have to feel like throwing darts in the dark. Start with the undertone tests, use brand shade finders with good photos, read detailed reviews, and don’t be afraid to use return policies.
The first match might take some trial and error, but once you nail it, you’ll have a reference point that makes every future purchase easier. Take notes, save your matches, and remember that even makeup artists sometimes need two tries to get it right. You’ve got this, and your perfect shade is absolutely findable without ever stepping into a store.


Post Comment